


An iPhone has always been the best choice for music as it’s the successor of the famous iPod, particularly designed to play music. Even though the device offers enhanced sound quality and an immersive experience, moving music files to an iPhone has never been easy. Everyone who has ever bought an iPhone has stumbled upon the question of how to transfer music from iPhone to iPhone.
The Music app is pre-installed on iOS devices and is a central hub for all your music. However, transferring music to your phone and sharing it with others can be challenging if you're unfamiliar with how to transfer Apple Music from one iPhone to another. But don't worry, I can provide you with tips and a guide on how to seamlessly move your music collection to a new iPhone or share it with friends.


Method 1: Send songs from iPhone to iPhone with iTunes (For Purchased Music Only)
iTunes lets you transfer purchased music between iPhones using a computer. This method is useful if you have songs bought from the iTunes Store.
- Connect your old iPhone to the Mac or PC having iTunes installed via USB cable.
- Open iTunes. If the device is connected properly, an icon showing the connected device will appear in the top-left corner of iTunes.
- You can either click the mobile icon or go to the “Devices” sidebar and click on the name of the connected iPhone. You’ll see all details of the device.
- Now open the File menu and go to Devices, then Transfer Purchases from [name of your iPhone]. This will transfer all the music purchased from your iPhone to iTunes. Once the transfer process completes, disconnect the old iPhone.
- Connect the new iPhone that you want all your music on.
- In iTunes, click Music and then check “Sync Music.” Then, select all the music that you want to transfer from iTunes to the new iPhone.
Method 2: Transfer Music from iPhone to iPhone without iTunes
MobileTrans - Phone Transfer is a powerhouse toolset presenting various professional features that can expedite your mission of how to transfer songs from iPhone to iPhone. This amazing software tool is compatible with all the major mobile operating systems out there such as Android, iPhone, and Windows.
This proficient tool can solve our problem of how to transfer music from iPhone to iPhone while involving only a few mouse clicks and no prior computer skills or knowledge is required.
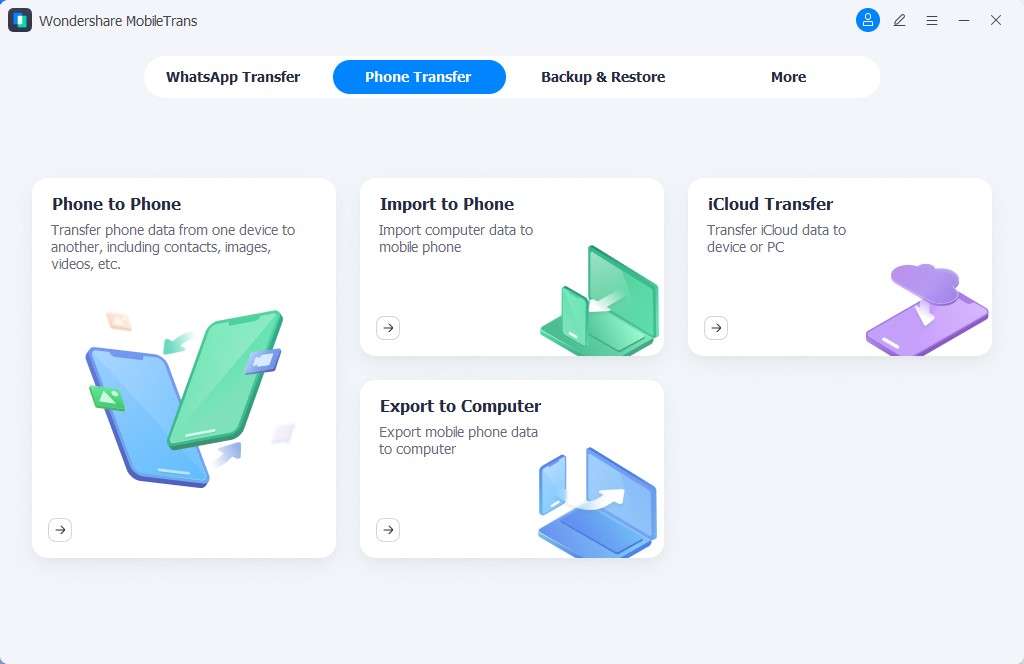
Step 1: Download the MobileTrans – Phone Transfer tool and install it on your computer system either a Windows PC or a Mac. The many options will blow your mind but don’t worry I’ll go through each step to guide you.
Step 2: Choose the “Phone Transfer” from the welcome screen. Connect both the sender and receiver iPhones to the PC using USB cables. They automatically will be detected by MobileTrans.
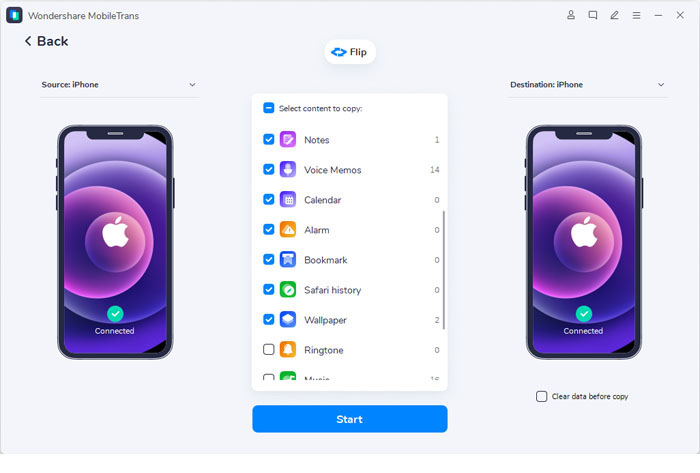
Step 3: One iPhone will appear on each side of the MobileTrans window after being detected automatically. You can “Flip” between the devices to make sure the source and destination iPhones are in the right place.
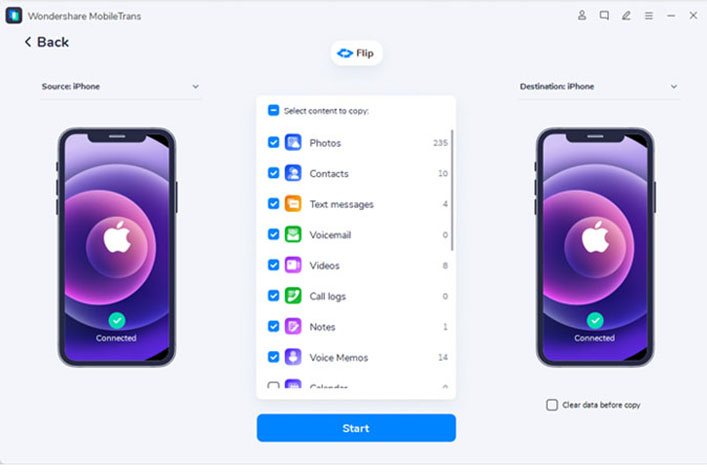
Step 4: On the same screen, you can select the type of files that you need to transfer from one iPhone to another iPhone. All the transferrable files are highlighted in blue and can be selected. Select the music files that you want to transfer.
Step 5: Press the “Start” button. You need to ensure both the devices are charged and don’t disconnect either device during the transfer.

Here is a video for you to learn how to transfer your data between both the iPhones with MobileTrans:
Method 3: Transfer Music from iPhone to iPhone Using Home Sharing (For Shared WiFi Networks)
Home Sharing allows you to stream music from one iPhone to another if both are on the same WiFi network.
- On the old iPhone, go to Settings > Music > Home Sharing and turn it on.
- Enter your Apple ID credentials.
- On the new iPhone, open the Music app.
- Tap Library > Home Sharing to access shared music.
Method 4: Transfer Music from iPhone to iPhone using AirDrop(For DRM-Free Songs Only)
AirDrop is an easy and fast way to transfer DRM-free music from iPhone to iPhone or any other iOS device nearby. AirDrop uses Bluetooth to discover and connect while the point-to-point Wi-Fi to provide high-speed file transfers. It is a swift, secure, and power-efficient method to send songs from iPhone to iPhone. However, it only works for individual song transfers and does not support DRM-protected Apple Music tracks.
There are two possible methods to turn on the AirDrop, the steps are as following
- Make sure both the iPhones are in the near vicinity and powered on.
- On the sender and receiver device make sure AirDrop is switched on to send and receive the music.
- Swipe to launch the Control Center.
- Press the AirDrop icon, it will pop up a menu for selection. To either turn it on or keep it switched off.
- Now press “Everyone” to turn on the AirDrop for anyone in the close vicinity to send music files using AirDrop.
- AirDrop can also be switched on in the iPhone “Settings” by going to “General” and then to “AirDrop” and turning on “Everyone for 10 minutes”.

- Head over to the iPhone from where you want to send the music files. Open the “Music” app and go to the music file or album you want to share. Then tap the “Share” button showing in the details of the music file. At last, choose the name of the target iPhone and send the music.

- On the receiver iPhone “Accept” the music.

Method 5: Transfer Music from iPhone to iPhone using iCloud (For Any Music File)
iCloud is the cloud storage service from Apple designed to offer private remote storage to every Apple user. We can use the service to backup music on iCloud and access it on any of our Apple ecosystem devices. In our case providing a solution for how to transfer music from iPhone to iPhone without a computer. So, let’s get going.
- Open the Settings on iPhone then go to “iCloud”.
- Look for “Storage & Backup”, here you can select the files you want to back up on to the iCloud storage.
- So, to include our music library into the backup, go to “Manage Storage” and select your device name. It will load some information about the device and backup files.

- Under the Backup options, tap the “Show all Apps” and when shown turn on the toggle button for the Music app.

- For this backup to take place your iPhone needs to be connected to a Wi-Fi network and a power source while also the iCloud will wait for the screen to be off for the backup process to save power.
- Now on the other iPhone, you can log in with the same iCloud ID and download all your music stored in the cloud storage remotely without any computer system interference.
Method 6: Transfer Music from iPhone to iPhone Using iCloud Music Library (For Apple Music Users)
If you have an Apple Music subscription, you can use iCloud Music Library to sync music across all your Apple devices.
- On both iPhones, go to Settings > Music.
- Toggle on Sync Library.
- Ensure both iPhones are signed into the same Apple ID.
- Wait for your music library to sync automatically.
Method 7: Transfer Songs from iPhone to iPhone using Dropbox
Dropbox as per the company is a file hosting system, which essentially means that it provides a cloud-based storage solution for its users. Its remote access allows its users to access any file at any time without the limitation of a device or locality.
- Download and open the Dropbox app on both iPhones.
- In the middle of the bottom menu, you’ll see the “Create” button, press it, and upload the music you want to share with the other iPhone.

- On the other iPhone sign in with the same Dropbox ID as the first one. Once logged in you can navigate to the file where you uploaded all your music and access the songs and even download them for offline access.

Conclusion
Apple’s products are famous for an extra layer of security and propriety of all the technology utilized. That’s why transferring and sharing music files on the iOS ecosystem is much harder and require some technical know-how. However, I’ve presented a fairly simple and 1-click solution for you to transfer music from iPhone to iPhone without the need to configure the remote storage solutions or network settings. The MobileTrans – Phone Transfer offers the best solution for all your data transfer needs in the mobile devices’ realm.
New Trendings

Top Stories
All Categories


Axel Nash
staff Editor